Composting is an eco-friendly way to transform kitchen scraps, garden waste, and organic materials into nutrient-rich soil. Understanding how to start composting allows you to reduce landfill waste, lower carbon footprint, and create natural fertilizer for your plants.
Whether you have a backyard, apartment, or limited outdoor space, composting can fit into any lifestyle. From simple compost bins to advanced worm composting systems, the process is highly adaptable. By learning proper techniques, you can maintain a healthy compost pile that breaks down efficiently while avoiding odors, pests, and other common problems.
In this guide, we’ll cover how to start composting at home, in a tumbler, for beginners, in apartments, with compost bins, and with worms. We’ll also explore essential composting tips, troubleshooting, and long-term maintenance strategies. This comprehensive approach ensures anyone can become a successful composting enthusiast, even without prior experience.
Understanding Composting – The Basics
Composting is the natural process of recycling organic matter into humus, which improves soil structure, retains moisture, and provides essential nutrients for plants. It relies on microorganisms, moisture, oxygen, and a balance of carbon and nitrogen materials to break down waste efficiently.
Proper composting reduces greenhouse gas emissions by diverting organic waste from landfills and contributes to sustainable gardening practices. By understanding the science behind composting, you can create a more effective system that accelerates decomposition and yields high-quality compost.
Key Points About Composting
• Composting transforms organic materials like food scraps, leaves, and garden waste into nutrient-rich soil through natural microbial activity, promoting sustainable soil health.
• Balancing green (nitrogen-rich) and brown (carbon-rich) materials is critical for efficient decomposition. Too much green waste can cause odors, while excessive browns slow down the process.
• Moisture is essential for microbial activity. A damp but not soggy pile encourages faster breakdown, while dry compost stalls decomposition.
• Oxygen supports aerobic microorganisms that produce rich, odorless compost. Regular turning or aeration prevents anaerobic conditions that cause foul smells.
• Temperature monitoring ensures the compost remains active. Hot composting accelerates breakdown, kills pathogens, and reduces seeds of unwanted weeds.
• Composting is a flexible process. Whether using bins, tumblers, vermicomposting, or open piles, the principles remain the same—balance, moisture, aeration, and patience.
Also Read:- How to Type Degree Symbol (°) on Any Device – Complete Guide
How to Start Composting at Home
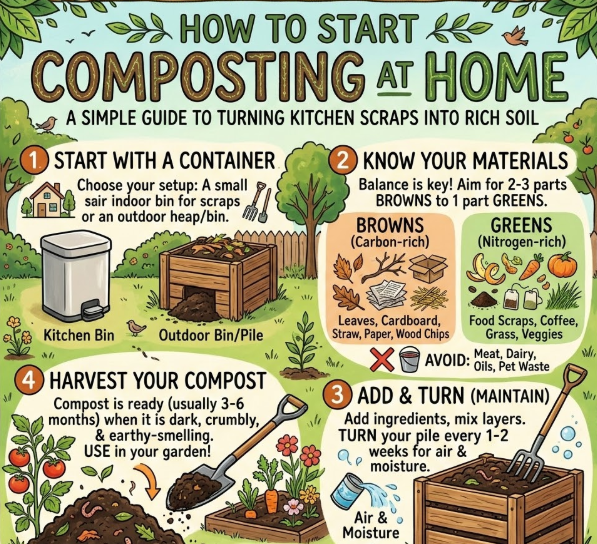
Starting composting at home allows you to recycle daily kitchen scraps and garden trimmings into valuable soil amendments. A backyard or garden provides ample space for compost piles or bins that can handle various organic waste.
By following simple steps, homeowners can implement a sustainable system that reduces trash volume and improves garden productivity.
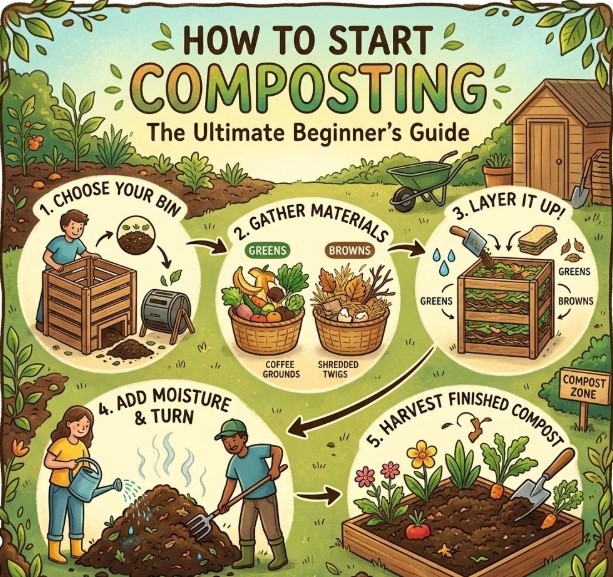
Home Composting Steps
• Choose a location with good drainage and partial shade to protect the compost from excessive sun or rain. Location influences moisture balance and microbial activity.
• Select a container, bin, or open pile suitable for your space and the amount of organic waste you generate. The size should allow easy turning and aeration.
• Collect green materials such as vegetable scraps, coffee grounds, and grass clippings, and brown materials like leaves, cardboard, and shredded paper.
• Layer greens and browns alternately to maintain proper carbon-to-nitrogen ratio, which promotes faster decomposition and reduces odor.
• Turn the compost regularly with a garden fork or shovel to aerate and redistribute materials, preventing compaction and anaerobic conditions.
• Monitor moisture and temperature. The pile should feel like a damp sponge, and a warm interior indicates active decomposition.
Also Read:- How to Make Obsidian in Minecraft: The Complete Expert Guide
How to Start Composting in a Tumbler
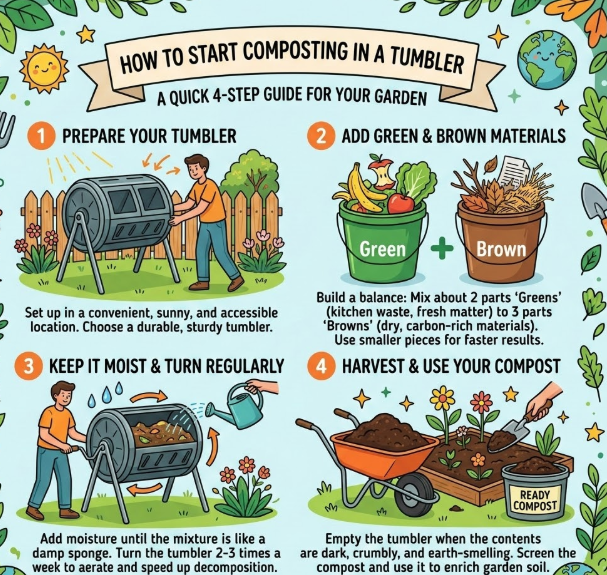
Composting in a tumbler is ideal for homeowners who want a controlled, fast, and odor-free composting process. Tumblers allow easy turning, which improves aeration and accelerates decomposition.
This method is especially useful for small yards or for those who want a neat, contained composting system. Tumblers also reduce pests and make harvesting finished compost easier.
Tumbler Composting Steps
• Choose a tumbler with sufficient capacity for your daily organic waste output. Rotating drums allow better mixing than stationary bins.
• Place the tumbler in a sunny or partially shaded area to maintain warmth, which enhances microbial activity and speeds up composting.
• Add a mix of green and brown materials, ensuring proper balance for nutrient-rich compost. Tumblers benefit from smaller, chopped pieces to accelerate decomposition.
• Rotate the tumbler 2–3 times per week to provide aeration and mix the contents thoroughly. Regular turning prevents odor buildup and anaerobic pockets.
• Monitor moisture; contents should feel damp but not waterlogged. Add water or dry browns as needed to maintain balance.
• Harvest finished compost from the lower section of the tumbler when it appears dark, crumbly, and earthy-smelling. This process typically takes 4–8 weeks.
Also Read:- How to Dice an Onion: The Complete Step-by-Step Kitchen Guide
How to Start Composting for Beginners
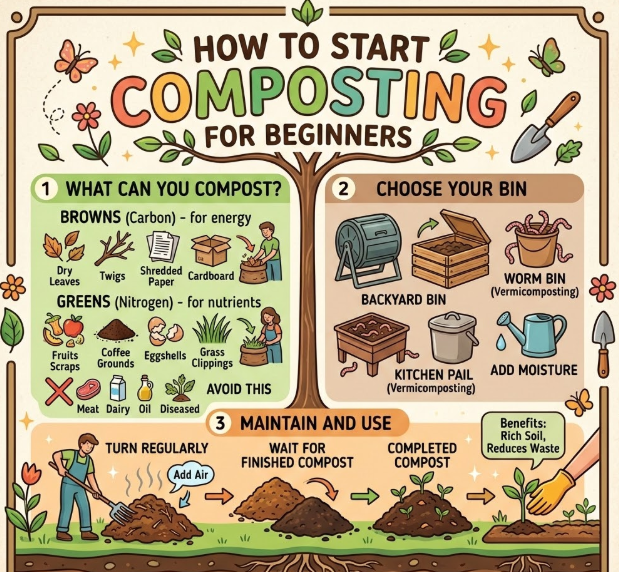
Beginners can start composting with simple methods that require minimal equipment and technical knowledge. Understanding the basics helps prevent common mistakes like odor, pests, and slow decomposition.
Even novice composters can achieve success by following a structured approach that emphasizes layering, moisture, and aeration.
Beginner Composting Tips
• Start small with a manageable pile or bin to avoid overwhelming yourself with too much organic material at once.
• Use a balanced mix of greens (kitchen scraps, grass clippings) and browns (paper, leaves) to maintain ideal decomposition conditions.
• Chop or shred materials into smaller pieces to increase surface area for microorganisms, speeding up composting.
• Cover the pile with a lid, tarp, or compost bin to retain moisture, regulate temperature, and prevent pests.
• Turn the compost weekly to aerate the mixture, avoiding anaerobic decomposition that produces unpleasant smells.
• Be patient; composting takes time, but consistent care results in rich, usable compost within a few months.
Also Read:- How to Ripen Avocados: Complete Guide for Perfectly Ripe Fruit
How to Start Composting in an Apartment
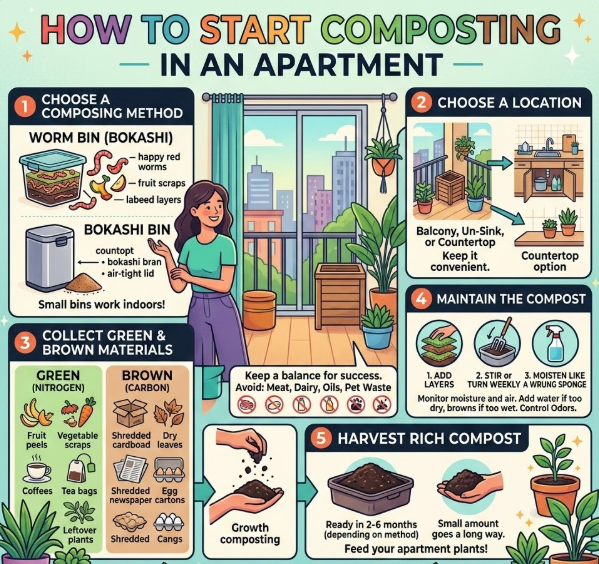
Apartment dwellers can compost successfully using compact methods like worm bins, Bokashi systems, or small countertop containers. These approaches minimize space requirements and odor while still producing nutrient-rich compost.
Urban composting solutions allow city residents to reduce food waste and contribute to sustainability without a backyard.
Apartment Composting Methods
• Use a small bin or container with a secure lid to store food scraps indoors, preventing odors and pests.
• Consider worm composting (vermicomposting) with red wiggler worms to efficiently break down kitchen waste in small spaces.
• Explore Bokashi composting, which ferments food waste in airtight containers and can be combined with soil composting later.
• Collect greens like vegetable peels, coffee grounds, and fruit scraps while avoiding meat, dairy, and oily foods that attract pests.
• Add brown materials such as shredded paper, cardboard, or dry leaves to balance nitrogen content and absorb moisture.
• Regularly monitor and manage moisture levels to keep compost healthy and odor-free in confined indoor spaces.
Also Read:- How to Fix WiFi: The Complete Step-by-Step Troubleshooting Guide
How to Start Composting Bin
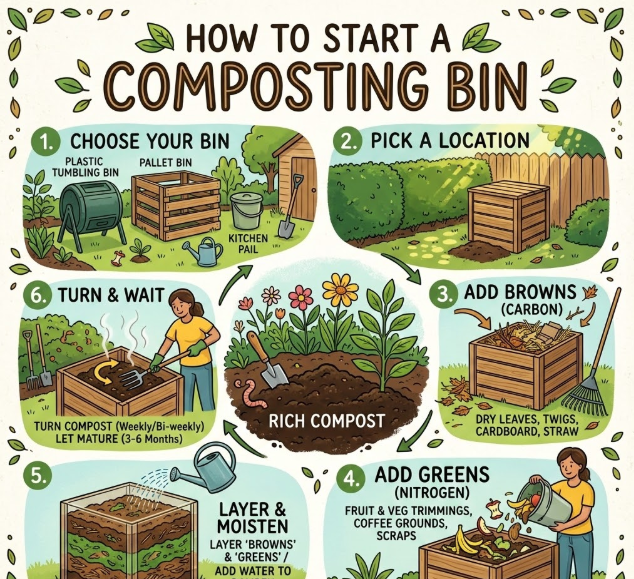
Compost bins provide a controlled environment for decomposition, keeping materials organized and minimizing odor. Bins are ideal for both outdoor and small-scale composting.
Selecting the right bin type, size, and location ensures efficient composting and ease of access for regular turning and maintenance.
Compost Bin Setup
• Choose a bin size suitable for your organic waste output; small bins for households producing limited scraps and larger bins for more active gardeners.
• Place the bin on bare soil or a well-drained area to allow aeration and facilitate access for microorganisms.
• Layer greens and browns systematically, starting with coarse browns at the bottom to promote airflow and drainage.
• Use a bin with ventilation holes or slits to allow oxygen flow, reducing the risk of anaerobic decay.
• Turn or stir the bin contents regularly to mix materials and maintain even decomposition.
• Harvest finished compost from the bottom or side openings when dark, crumbly, and earthy-smelling.
Also Read:- How to Take Care of Mums: The Complete Expert Guide to Healthy, Long-Lasting Blooms
How to Start Composting with Worms

Vermicomposting uses worms, typically red wigglers, to convert organic waste into nutrient-rich worm castings. This method is highly efficient and suitable for indoor or small-scale setups.
Worm composting accelerates decomposition and produces excellent fertilizer for potted plants and gardens.
Vermicomposting Steps
• Set up a worm bin with bedding materials like shredded newspaper, cardboard, or coconut coir to provide a suitable habitat for worms.
• Introduce red wiggler worms, which are highly effective in consuming kitchen scraps and producing castings.
• Add food scraps gradually, avoiding meat, dairy, and oily items that can attract pests or harm worms.
• Maintain proper moisture; the bin should feel like a damp sponge, ensuring worms remain active.
• Turn or gently mix bedding weekly to prevent compaction, provide aeration, and distribute food evenly.
• Harvest castings every few months; sift worms from the finished compost and use the nutrient-rich material to enrich soil.
Also Read:- How to Paint a Rose: The Complete Step-by-Step Guide for Artists
Common Composting Mistakes to Avoid
• Adding meat, dairy, or oily foods that attract pests.
• Failing to balance green and brown materials, causing slow decomposition or odors.
• Overwatering, leading to anaerobic conditions and foul smell.
• Neglecting to turn or aerate the compost pile regularly.
• Using large, unshredded scraps that take longer to decompose.
• Placing compost in poorly drained or overly shaded locations that reduce microbial activity.
Also Read:- How to Clean Strawberries: The Complete Food-Safety Guide
Conclusion
Learning how to start composting is a powerful step toward sustainable living. Whether at home, in an apartment, using a tumbler, a compost bin, or worms, composting transforms waste into valuable, nutrient-rich soil.
By following proper layering, moisture, aeration, and monitoring techniques, beginners can develop a successful composting habit that reduces waste, enriches gardens, and supports environmental health. With patience, consistent maintenance, and attention to detail, anyone can create thriving compost systems that contribute to long-term sustainability.
FAQs
Can I compost meat and dairy?
No, these attract pests and slow decomposition in most backyard or indoor systems.
How long does it take for compost to be ready?
Traditional composting may take 3–6 months; hot or worm composting can be faster.
Can I compost in winter?
Yes, but decomposition slows in cold weather; insulated bins or indoor worm composting help maintain activity.
What is the difference between a compost bin and tumbler?
A bin is stationary, while a tumbler rotates for faster decomposition and easier turning.
How do I know if my compost is too wet?
It should feel like a damp sponge; excess water can create odor and anaerobic conditions.
Can I compost in an apartment without a yard?
Yes, using worm bins, Bokashi systems, or small indoor containers works effectively.
For More Visit guideitfast.com