
Learning how to paint a rose is one of the most rewarding exercises for both beginner and experienced artists. Roses are iconic symbols of love, beauty, and elegance, and mastering their delicate petals and intricate structures allows you to develop a deep understanding of color blending, shading, and composition. Painting roses also improves observation skills, hand-eye coordination, and your ability to capture natural forms in both realism and stylized art.
Roses are one of the most painted flowers in history, appearing in works from classical still lifes to modern botanical illustrations. According to art education studies, practicing flower painting enhances an artist’s ability to replicate complex organic shapes while experimenting with textures, gradients, and highlights. Understanding the basic anatomy of a rose—including petals, stem, and leaves—helps artists create realistic depth and dimension.
How to Paint a Rose Easy: Simplified Method for Beginners

For those new to painting, starting with a simplified rose technique helps build confidence and ensures success. Painting a rose easy focuses on basic shapes and layering, avoiding overwhelming details while still producing a visually appealing flower.
• Understand Basic Rose Structure
Roses consist of a central bud surrounded by overlapping petals. Recognizing this structure makes it easier to break the flower down into simple shapes. Start by drawing a spiral for the bud, then add semicircles for outer petals.
• Choose Primary Colors
Begin with one or two main colors to create depth. For instance, a red rose can use crimson and pink variations, while a yellow rose might include golden yellow and pale yellow highlights.
• Sketch Lightly
Use a pencil or light wash to outline the petals. Soft lines prevent mistakes from showing after paint application.
• Apply Base Layer
Cover the rose sketch with a flat, even layer of your base color. This sets the foundation for shading and depth.
• Add Petal Shading
Apply darker tones at the base of petals and lighter highlights on edges. This creates natural-looking dimension.
• Final Touches
Add fine details like veins or subtle color variations to make the rose appear realistic without overcomplicating the painting.
Also Read:- How to Ice Skate: A Complete Step-by-Step Guide for Beginners and Beyond
How to Paint a Rose Step by Step: Detailed Process for Realistic Results
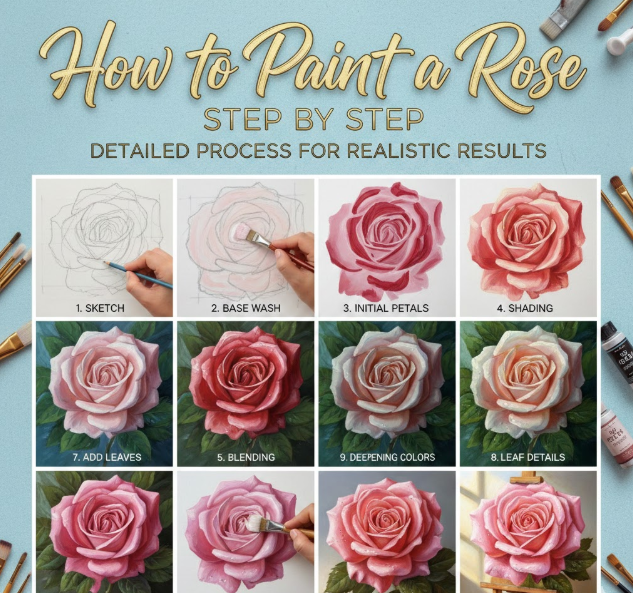
Step-by-step techniques are essential for artists aiming for realism. Each stage focuses on building layers, controlling tones, and creating smooth transitions.
• Stage 1: Drawing the Outline
Begin with a light pencil sketch, marking the central bud and petal arrangement. Use circular motions for petals and define leaf shapes around the rose.
• Stage 2: Base Color Application
Fill in the petals with a mid-tone base color. Acrylic, watercolor, or oil can be used depending on your medium preference.
• Stage 3: First Layer of Shadows
Identify light source direction and shade the areas where petals overlap. This creates a three-dimensional effect.
• Stage 4: Highlight Petal Edges
Use lighter tones or white to highlight petal tips, enhancing depth. Blending tools like brushes or sponges can help smooth transitions.
• Stage 5: Adding Leaf Details
Paint leaves with a combination of greens and touches of yellow or brown. Include veins to make them lifelike.
• Stage 6: Refine and Adjust
Review the painting for contrast and color balance. Add subtle highlights or deepen shadows to finalize the rose’s realism.
Also Read:- How to Clean Strawberries: The Complete Food-Safety Guide
How to Paint a Rose Acrylic: Techniques for Vibrant Results

Acrylic paints are popular due to their fast drying time, versatility, and ability to layer colors. Painting a rose acrylic involves understanding blending, layering, and brush selection.
• Choose Quality Acrylic Paint
Select professional-grade paints for better pigment intensity. Low-quality acrylics can appear dull and uneven.
• Use a Medium-Sized Round Brush
Round brushes help create smooth petal curves and allow for detail work. They are versatile for both broad strokes and fine lines.
• Apply Thin Layers
Build color gradually to prevent harsh edges. Acrylic dries quickly, so layering helps control depth.
• Blend Edges While Wet
Blend two tones gently while still wet for smooth gradient effects on petals.
• Incorporate Highlights
Use a lighter shade or white to emphasize petal curvature and central bud.
• Seal Finished Painting
Apply varnish to protect the acrylic painting and enhance color vibrancy.
Also Read:- How to Play Spades: The Complete Guide for Beginners and Enthusiasts
How to Paint a Rose Watercolor: Soft and Elegant Techniques

Watercolor roses are delicate and ethereal. Watercolor painting emphasizes transparency, fluidity, and gentle gradients.
• Select High-Quality Watercolor Paper
Thick 300gsm paper absorbs water without warping. Paper texture also adds dimension to petals.
• Wet-on-Wet Technique
Wet the paper slightly before applying paint. This allows colors to blend naturally, ideal for soft petal transitions.
• Layer Colors Gradually
Apply pale base washes first, then progressively add darker tones to create shadows.
• Preserve Highlights
Use masking fluid or leave areas blank to maintain natural highlights.
• Detail Work with Fine Brush
Once dry, add delicate lines, veins, or petal edges for realism.
• Finish with Light Lifting
Use a damp brush to lift excess color or soften edges.
Also Read:- How to Fill Out a Money Order: Complete Step-by-Step Guide
How to Paint a Rose on a Rock: Creative and Decorative Art

Painting roses on rocks is a fun craft that combines fine art with functional décor. It requires slightly different techniques due to surface texture.
• Choose Smooth, Flat Rocks
Smooth rocks are easier to paint on and hold fine details better.
• Clean and Prime the Surface
Wash rocks thoroughly and apply a white acrylic base for paint adhesion.
• Draw Rose Outline
Use pencil or chalk to sketch the rose lightly.
• Apply Base Colors
Layer base tones on petals first, then build shadows and highlights gradually.
• Add Finishing Details
Include leaf accents or additional textures for a polished look.
• Seal with Varnish
Protect the artwork with a clear acrylic sealer to ensure durability.
Also Read:- How to Cancel Spotify Premium: Step-by-Step Guide
How to Paint a Rose with Acrylic Paint: Advanced Layering Techniques

This section emphasizes advanced techniques like glazing, wet blending, and texture creation.
• Use Layered Glazing
Thin layers of translucent paint create luminous petal effects.
• Experiment with Palette Knife
Palette knives can add texture and realistic petal edges.
• Wet-on-Dry Blending
Blend colors while the base layer is dry for controlled gradients.
• Emphasize Central Bud
Highlight the center with vibrant or contrasting tones.
• Incorporate Leaf Shadows
Shadows under petals add depth and realism.
• Apply Varnish
Seal the painting to protect color and texture.
Also Read:- How to Lose Face Fat at Home: Fast Methods That Work
How to Paint a Rose in Oil: Techniques for Rich, Lush Colors

Oil paints allow rich colors, slow blending, and detailed realism, perfect for lifelike roses.
• Use Linseed Oil Medium
Mix colors with linseed oil to improve flow and blending ability.
• Build Base Layers
Start with mid-tones, gradually adding darker shadows and lighter highlights.
• Wet-on-Wet Blending
Oil allows blending directly on canvas, perfect for smooth petals.
• Fine Detailing
Use small brushes for petal edges, veins, and highlights.
• Layering for Depth
Multiple layers of transparent paint create rich dimensionality.
• Varnish for Longevity
Seal completed oil painting with protective varnish.
Also Read:- How to Stop Coughing: Effective Remedies Backed by Experience and Science
Conclusion
Learning how to paint a rose enhances artistic skills while producing beautiful floral artwork. From easy beginner methods to advanced acrylic, watercolor, and oil techniques, roses offer opportunities to practice shading, color blending, and realistic detailing.
By practicing step-by-step approaches, experimenting with materials, and observing real roses, artists can create stunning, lifelike floral compositions. Roses are versatile subjects that add elegance to canvas, paper, and even decorative rocks, making them ideal projects for all skill levels.
FAQs
Can beginners paint realistic roses?
Yes, simplified techniques and step-by-step guides make it achievable.
Which medium is best for rose painting?
Acrylic is versatile, watercolor is delicate, oil is rich and smooth.
Do I need a reference photo?
Reference photos help capture realistic shapes and colors.
How do I paint highlights on petals?
Use lighter tones or leave small areas unpainted for natural light reflection.
Can I paint roses on objects other than canvas?
Yes, rocks, wood, or fabric are excellent creative surfaces.
For More Visit guideitfast.com